Christmas For A Song: Paper Snowflakes Tutorial
>> Friday, November 20

snowflakes adorning my desk at work
If you're like me, a slim wallet is seriously cramping your holiday cheer this year. I LOVE giving gifts, more than receiving them, actually (though of course, receiving is still nice). I've already made a list of everyone to whom I plan to send something, and for the next few weeks I will brainstorm furiously for that meaningful gift.
Problem is, my joy in giving tends to far outpace my earning capacity. For example, for one friend I wanted to get a custom cross-stitch pattern. They only cost $5 on Etsy. Catch is, to buy the cotton to stitch on is about another $5, and the thread is $1 per bundle. You need anywhere from 10-30 threads per pattern. In other words, not happening.
So even though I have yet to think of a gift for her, my mind has been chewing over other, more pocket-friendly ideas, things I could for "for a song." I have jotted a few down already, and in the coming weeks will post them as part of my "Christmas For A Song" series. First up? Paper snowflakes!

TUTORIAL:
HOW TO MAKE BEAUTIFUL, ONE OF A KIND PAPER SNOWFLAKES
Materials / Instructions / Style tips / Cautionary tips / Examples
Materials / Instructions / Style tips / Cautionary tips / Examples
Cost:
potentially $0
Materials:
White scrap 8.5"x11" paper, blank on one side
scissors
tape
thread
scissors
tape
thread
Skill level:
Intermediate

CLICK HERE for the rest of the post
Instructions:
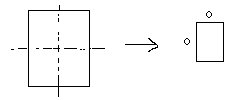
- Fold one sheet of 8.5"x11" paper in half, then in half again. (The "o" signifies open-edged.)
- Take the folded edge and align it with the right edge.
- Snip off the remaining paper (save this strip for later!)
- Open the triangle back to a square and cut the paper into four squares along the folds. Put aside three of the squares for later.
- Take the remaining square and fold it into quarters.
- Now fold this in half to make a triangle.
- Grab your scissors and hold the triangle by the center with the most-folded corner at the bottom (open edges should be at the top).
- Carefully cut out your shape (styling and cautionary tips below!).
- Unfold. Beautiful, eh?
- Repeat steps 5-9 for the three remaining larger squares.
- Now take the strip you laid aside earlier. Fold it in half and then half again until it is almost a square.
- Take the folded edge and align it with the right edge.
- Snip off the remaining paper (these little scraps will not be needed)
- Now you have four smaller squares. Follow steps 5-9 for each one.
- Now you have four large and four small snowflakes. String them along a piece of thread that is as long as the display you would like to make. Tape the snowflakes at even intervals to the thread.
- Hang/tape up along the top of a window, over a door or mantel, or along the top of a wall and enjoy!


A. Follow steps 1-5 above.
B. Now cut the two open-edged sides into a quarter-circle shape.
C. Unfold. You should have a circle. Don't worry if it's not an exact circle, it won't show in the finished snowflake.
D. Fold the circle in half to make a semi-circle.


The hard part of this project is where you pause and think at step 8, What do I want my snowflake to look like? Here are some tips to get you started. Then run with your imagination!
Styling tips:
- Keep all of your lines of roughly equal length, and the thinner the better. Ideal width is between 1/8" and 1/4" (2mm-5mm).
- To vary the overall shape of the snowflake, cut deeply into the open-edged side.
- Remember that the two edges that are folded will fold out DOUBLE width, so cut those thinner for a more even look.
- Try to come up with a theme for each snowflake. Make most of your cuts triangles for a sharp, star-like pattern. Or cut a lot of curves and circles for a more graceful look.
- Don't be afraid to experiment. Your supplies are super cheap, each snowflake takes only 1-3 minutes a piece to make, and all the scraps are already making a mess, so you've nothing to lose!

Cautions for every snowflake:
- Be careful how you cut at the middle of the snowflake (this is the corner at the bottom that has no open edges). The more you cut off, the larger your center hole will be and the weaker your overall structure.
- Before making a cut, place your paper such that the the tip of the scissor blade ends where you want the cut to end. That way you don't over-cut and ruin the snowflake! javascript:void(0)
- No matter what, you will make a mess! Keep a trashcan nearby, and between each snowflake sweep off your work area into the trash can. This will save you from a headachey clean-up at the end!
Example #1


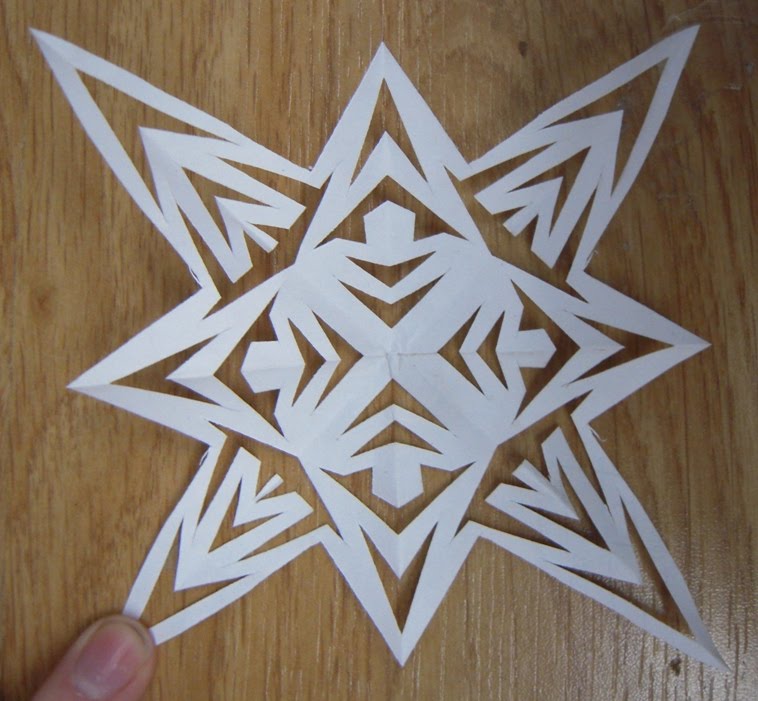
What I did wrong:
- I forgot about the doubling along folded edges. See how in the upper left everything looks the same width? Well, when you cut parallel to a fold, you need to make the width half so that when it folds out, it's the same width as the other parts of the snowflake. Oops.
- I cut deeply into the open-edged side, creating an interesting overall shape (when you forget to do this, your snowflake is basically square and that usually doesn't look so good).
- I kept cuts near the middle of the snowflake to a minimum, and this strengthened the overall structure of the snowflake.
- I kept the overall theme of the snowflake consistent. Notice all the points and triangles?
Example #2


What I did wrong:
- I cut way too much out of the middle, severly compromising the integrity of the structure. Oops.
- I barely altered the overall shape of the snowflake, by cutting deeply into the open-edged side, hence it's rather boring squarish shape. Oops.
- Well, I like the cross shape. :)
Example #3


What I did wrong:
- Actually, I really like this one. Cool.
- I cut into the open-edged side, creating an interesting overall shape.
- I kept cuts near the middle of the snowflake to a minimum, and this strengthened the overall structure of the snowflake.
- The pattern is even-width and pleasing to the eye. I really like this one.
There you have it! I hope this was of some help to you. As you get in a lot of practice, you'll begin to see what works and what doesn't, and you'll have more and more freedom to adjust and even break some of the rules I listed. I'd love to see how your snowflakes turn out! Leave a link to your beauties in the comments. :)
Happy flaking!
NOTE: This tutorial is copyrighted 2009 by Emily Stevenson of Caleb and Emily Designs. You may download, print and use, or copy to your website free of charge, but you MUST credit us both by name and with a link leading back to this post. You may not earn money by selling this tutorial, though any items made with it are yours to use/sell as you please. Thank you.
0 comments. Leave a comment.:
Post a Comment