Showing posts with label Works in progress. Show all posts

Letterfu designs, updated!

>> Thursday, June 24


So I don't know if you remember my previous post on the letterfu products, but here are some of my initial designs and printings. I'm very excited to be working with Alex--who created the concept--and for being introduced to Open Office through this project.


It has literally taken me weeks of tweaking with margins and printer settings and paper types but I think I have finalized a template that prints perfectly on Crystal's gorgeous handmade paper. Stay tuned! I'll let you know when the finished product is available in the shop.


These designs are based on the following paintings:

  • Bongo the Octopus
  • Forsythia
  • Cacophony of Colors
  • Tiny Pond Series: Froggie's Lettuce


  • Read more...

    Invitations, the first stage: Design!

    >> Monday, June 21

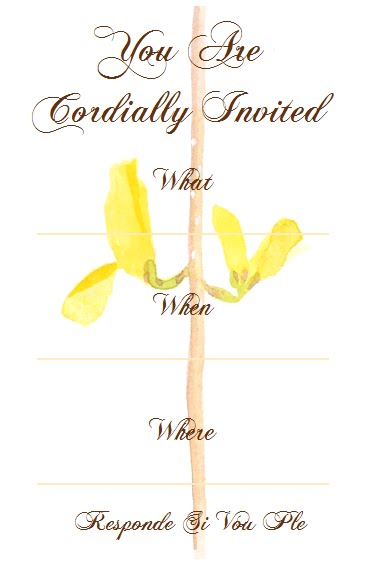
    I've been playing around with the idea of making some of my designs into invitations. So far I've put forth two designs that once I receive my replacement black ink (I swear my printer binges on ink when I am not looking!) via Amazon I'm going to print out and experiment with.

    Oh and please forgive my spelling of RSVP--I know it should be Répondez s'il vous plaît--I designed these well after midnight on a work night and apparently my highschool French skills failed me miserably.


    This one features my Tiny Pond Series painting Japanese Maple Leaf. The idea is to print out this image and then attach it to a piece of maroon cardstock that is a 1/4inch bigger on each side. I thought of maybe even layering the center image like that--instead of printing the maroon border, print out the maple leaf separate, attach it to another square piece of marron, glue THAT onto the invitation whichis then attached to the aforementioned largest piece of maroon cardstock. Just a thought.


    The second invitation is much simpler and more elegant. I was thinking of maybe giving this a yellow cardstock backing, but maybe not. Maybe if I just print it on lovely edged cardstock or something. We'll know when I'm done waiting on my ink. :)

    Any feedback or suggestions you have would be spiffy. Thanks!!

    Read more...

    Tutorial: How to draw something you've no idea how to draw using your favorite ... music?!

    >> Wednesday, June 16


    I love birds. I love brids' pretty feathers, plump bodies and quick, jerky movements. At my parents' house I have a little budgie named Zoe. Her cage is by the computer and she chirps and sings and throws seed at you until you pay attention to her. And a few years ago I found a little pink newborn bird in our parking lot. I took it in and fed it cat food dissolved in water (ironic, eh?) and it grew into a beautiful house sparrow named Kevin.


    Though I love birds, I've never drawn them before. I can do a cartoon penguin OK, but as far as a serious painting, not really. One of my aunts LOVES titmice (titmouses?) so I thought I'd start with that particular species. Here's how I did it:


    How To Draw Something You've No Idea How To Draw Using Your Favorite Music


    You will need:


  • sketch paper
  • pencil
  • eraser
  • computer with internet
  • a large selection of your favorite music
  • perseverance
  • bravery/lack of artistic inhibition/courage
  • enthusiasm


  • 1. Go online and google what you are trying to draw. Use the "Image" search page for better reults. Right click and save any and every photograph that has a clear representation of your desired subject. I say go only for photographs and not artwork because you want to develop your own interpretation of the real thing, not imitate another artist's style. Other sites to try are Deviant Art and Flickr.

    NOTE: This isn't violating copyrights if you do not keep or use the images beyond this little exercise. Your sketches will be basic enough that they will not be in violation of the photographers' artistic rights.


    2. Make sure that you have saved all the photos into a folder devoted just to them. Open the first image in an image browsing software that will allow you to skip to the next photo with one click or one press of a keyboard button (I use Windows Picture and Fax Viewer, for example, and can scroll through the photos using an arrow key).


    3. Gather up your paper, pencil and eraser. Get comfortable and have your computer at arm's reach.


    4. Press play for your first song. Begin sketching the first image up on your screen. Guess what? You have only until the end of the song to finish your sketch! So think overall picture and don't immediately focus on the details. I try to establish a general outline, and then go over the entire sketch pruning and refining, and then if I still have time left I zone in on details.


    5. As soon as the next song begins to play bring the next image up on your screen. Sketch until the next song. Repeat until your run out of images or songs or patience. :)


    You should notice that as you sketch, you will begin to get a feel for whatever it is you're sketching. For example, with my titmouses (titmice?!) I noticed that the wings are attached to the sides of the bird--for some reason I always thought the wings would be on top of the body. And I noticed that their knees bend backwards! Didn't predict that one. Also, you should find that though your first sketch will most likely be comical, your last few sketches should be quite an improvement.


    What do you think of this method? I'd be interested in what other sketching games are out there that you play to help improve your skills. :)

    Read more...

    Complicated Papercut Fish--My First Attempt

    >> Tuesday, April 20


    This is my first truly complicated ONE-PIECE papercutting attempt. I going for a fish shape with lots of ocean designs inside like bubbles, seaweed, shells, little fish, starfish, a sea urchin, etc. You can see that I am about halfway done.


    I'm pencil drawing on one side to map out my designs and also make sure I don't cut too close to the edge and compromise the strength of the piece.


    Then I'm drawing in the little patterns and pictures to make sure that the designs overlaps enough to keep the papercutting strong and correctly shaped overall.


    Even though I'm only about half done it's getting a bit overwhelming, so I have "cheated" and folded parts of the paper over itself to double-up the design and half the cutting time. I actually like this effect, though--visual symmetry relaxes and pleases the mind.


    I'll take more pictures once I've completed the project. One thing is for sure, though--if I want to get any more details I'm going to have to upgrade from scissors to an Xacto knife.

    Read more...

    Wee sketches

    >> Saturday, April 17

    FRONT: You two are so cute together... INSIDE: ...that it's actually kinda gross. But seriously, HAPPY ANNIVERSARY!

    A dear friend of mine asked me to design a series of little notes cards for various occasions (birthday, thank you, sympathy, etc.). She wanted silly/humorous little cartoons or sketches, something lovely and homemade.

    I was thinking this could be a "sympathy" or "missing you" card.

    At the word "cartoon" my heart sucked in it's breath--cartoons are definitely not my strength, probably because I never practice them due to a childhood dissatisfaction with my earliest work.

    FRONT: [Ladybug sketch] INSIDE: Dude. You Rock. (Thank you SO much!)

    Realizing that this is about the world's lamest excuse to not try again, I sat down the other night to sketch. With a pen. Ooooh.

    These are the best of the sketches I came up with, along with caption/wording for the card.

    No idea on a caption for this one yet...

    I am planning on printing them out ont he computer, and then briefly handcoloring each one with either colored pencils or watercolors (I'd prefer watercolors but they might bleed the printed ink?)

    What do you think oh my "wee sketches" and captions? TOO corny? :)


    FRONT: You are wonderful and unique... INSIDE: ...just like everyone else. Oh well. Happy birthday!

    Read more...

    WIP: Another Tiny Pond painting

    >> Friday, April 9

    Work In Progress: watercolor, 1.5"x1.5"

    The ridiculously nice weather (88F in April?!) has brought the whole county out of hibernation and into the pond store. The weeping cherry trees, daffodils, crocuses and water plants are all blossoming and growing, the fish are coming out of their underground tunnels and splashing at the surface of the ponds, and the fountains and waterfalls are flowing.


    So with all this inspiration dumped in my lap I decided to take up my Tiny Pond series again. Last night I cut twenty-four new 1.5"x1.5" pieces of watercolor paper to aid this creative explosion. There are 95 reference photos on my computer for this project , so watch out world! :)


    This painting is definitely not finished yet. The values are all wrong--I need to lighten areas and very much darken others--and the textures are not where I want them, e.g. the lily pads don't looks wet. I'll post more pictures when I've made some significant progress.


    Reference photo I took in one of the greenhouses last year:

    Read more...

      © Blogger template Simple n' Sweet by Ourblogtemplates.com 2009

    Back to TOP